
Recomiendo verlo en HD desde vimeo
I advise to watch it in HD from vimeo
Aquí está por fin la animación... oooooeoeoeoe... ha sido un poco heavy... a veces frustrante... pero bueno a valido mucho la pena.
La idea surgió al ver un matte que hicieron los de Blizzard, creo que para el WOW, cuando estaba en Plantet 51 desarrollando en 3d los entornos, vegetación y dando soporte a matte painting. Entonces empezaron a aparecer ideas de como ahorrar tiempo (que es muy valioso... pero mucho...) utilizando matte paintings para algo más que para fondos. Buscando información por ahi he visto matte paintings de hasta primeros planos... cosas realmente curiosas y algunas brutales... Resumiendo, que me ha resultado interesante el tema y aquí os presento el resultado del primer test y os muestro parte del proceso.
The animation is out... oooooeoeoeoe... it has been a bit heavy, sometimes frustrating, but it has been worthwhile.
The idea came up when I looked up a Blizzard's matte painting, I think it was for WOW, when I was working in Planet 51 with the 3D development of enviroments, vegetation and to support matte painting department as well as the shading. Then ideas begin to come up to save time (it is very valuable) using matte paintings for something more than backgrounds. Searching information I have watch matte paintings videos for close ups... curious and amazing things... In short, I've found it very interesting and here I show you the firts test result and part of the process.
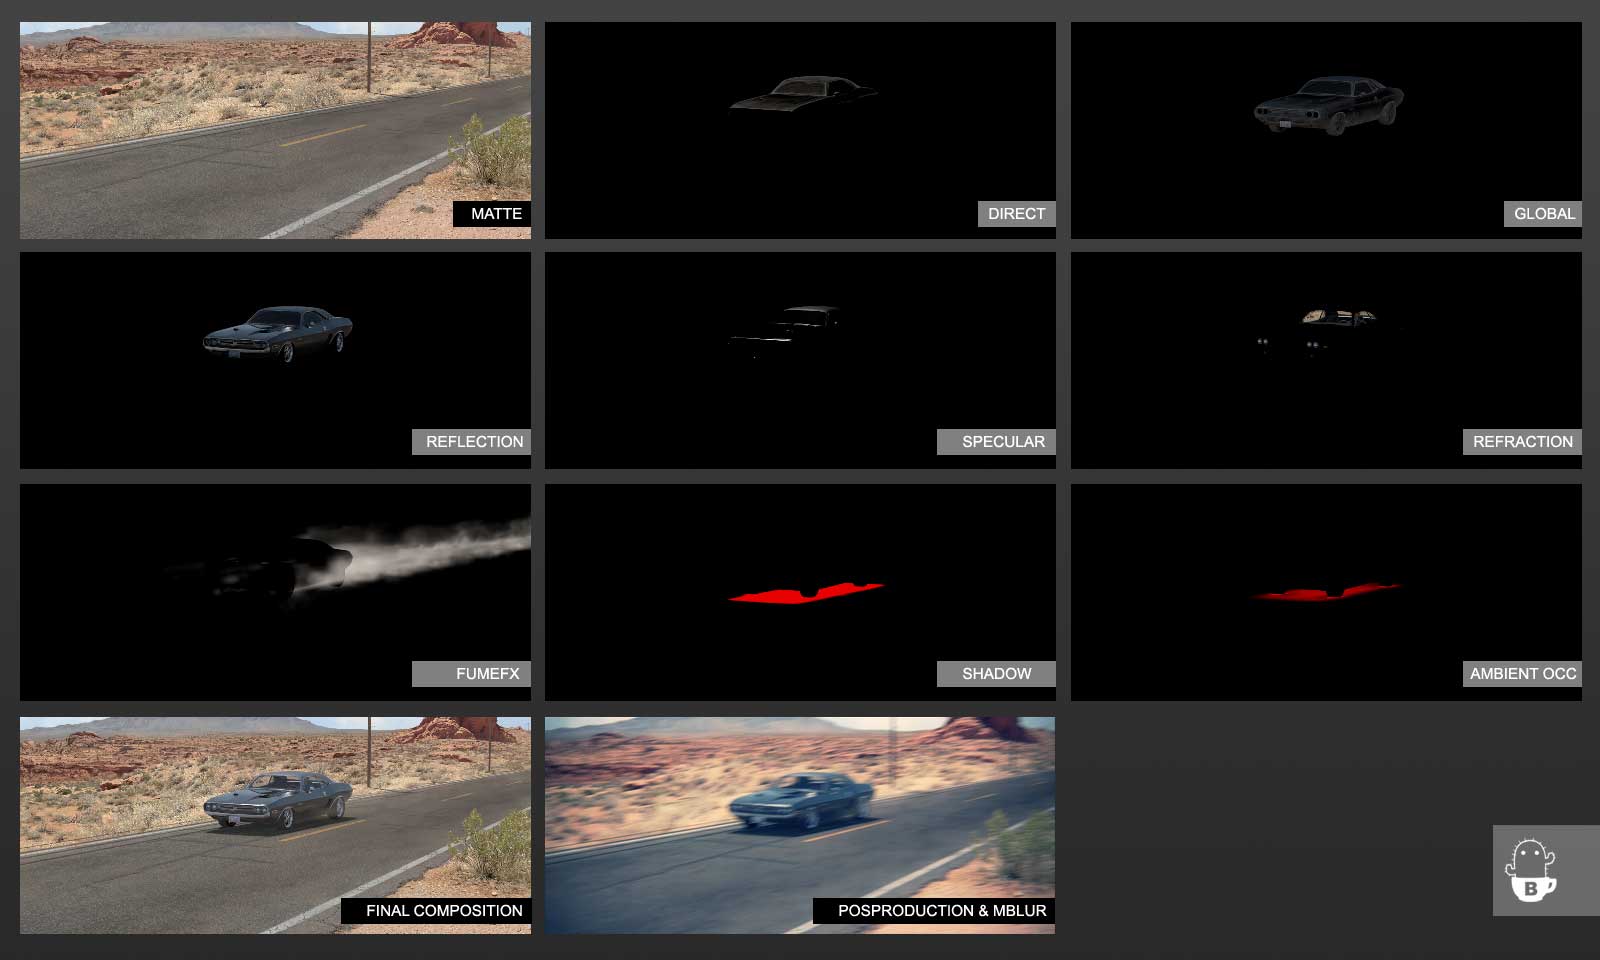
MATTE PAINTING


It is the final matte painting, the original size is 10000 pixels, and would become the main focus of the exercise. The idea was to do a matte painting that would enable to the camera free enough rotate and an important zoom. Here it is the concept I created in Max, it is where I animated as layout, it worked to establish the image size, objects scale, depth, timing, etc., as the final animation, it changed enough and I had to redo anything. Also I update a picture with the 3D elements I used as support. The rocks are modelling from a subdivided box and procedural displace, the bushes are scattered with PFlow and the light posts are from Google 3D gallery... very useful in cases like these.


En próximas pruebas intentaré una especie de "multidomo", un domo con capas para crear más sensación de profundidad y conseguir a parte de rotación algún tipo de movimiento de cámara. Pero la caña será con camera mapping... que creo que es con lo que empezaré los nuevos tests...
In the next tests I will try to use some like a "multidome", a dome with layers to give more sensation of depth and to obtain some camera movement besides the rotation. But the camera mapping is more difficult... I think it is with I will start the new tests...
COMPOSICION & POSPRODUCTION

These are some set-ups of the layers and the Nuke tree. The color correction was done in After effects because I don't know to work with Nuke very well yet and I haven't found a damned "color balance". I update this because as a beginner I am, if I would find this information would be very useful and if someone knows a better way to do it please let me know, because all comments, advices and criticisms are welcome.
Madre!! me he hecho caquita, enhorabuena, creo que me toca encerrarme en casa una temporada, tengo muchoooooo que mejorar, sigue asi! ;)
ReplyDeletetienes unos curros brutales
ReplyDeletesigue dándole !
Well done man. Good work through out the blog. Keep it up!
ReplyDeleteEiiiiiii!!! gracias tios, es una alegria que os paseis por aquí.
ReplyDeleteJavi ya sabes que si tienes alguna duda...
thnx Clinton.
Mae, que excelente pagian y q bonitas las cosas q has hecho realmente de calidad, yo me dedico tamben al 3D pero no tengo un nivel tan alto como el tuyo, en especial en texturas. un saludo
ReplyDeleteAwesome... I really like what you did...
ReplyDeleteWhat I don't understand... how can you match the pano photograph with the camera animation ?
And how can you match the 3d terrain you built exactly to the layout of the photos ?
Would you like to show us the process how you combine the pano photo and the 3d objects, plus the camera ?
thank you so much .. great work !
Thanks cosmo.
ReplyDeleteFirst i create the 3d layout and put an animated camera with a movement desired. The camera movement is very important because establish the matte painting technique to use. In this case it's nearly 160º rotation. Then i put another camera in the same position that the first and create a 360º panorama image with panorama exporter in 3dsmax. Now i have a reference image to paint the matte and put after like a texture in a dome. To optimize the image size i cut out the part not visible to camera.
After i retouch the camera movement adding a bit noise to simulate the shoulder cam.
I hope i would help you.
Thx for the info... but still not 100% sure if I cold follow you...
ReplyDelete1. 3d layout
How does your 3d layout look like ?
Is it just a new scene, with your preferred 3d objects inside ? Like your car, your road, your cam, etc ?
2. Camera Animation
So you are still in your scene file with your 3d objects, and you place your camera with the movement where ever you want ? I mean, where ever you want in 3d space ?
3. Panorama
We are still in your scene file, and still... you didn't use any matte painting... we only have your 3d scene file with your 3d objects (like road, car,cam, etc.) ... and in this scene, you create a new camera to render a 360 pano.
Ok.. the 360 pano you render inside max, do you render as 32bit floating hdr ? Or just as 8 bit jpg ?
4. Starting to paint the matte
Wow... what a journey so far... if I can follow you... now you basically open the 360 pano you have rendered from max... and on that pano you can see your road, your stones, etc.
You open it inside Photoshop as a reference layer.
And on top of it, you paint over the geometry from the real photo ?
Is that what you do ?
And let's say I could understand you, and this is the right way... how do you bring your matte-painting back into max ?
I am working with Maya, but I would say it can be done the same way... I just can't imagine, how you project later inside max/maya your matte-painting ?
Just as background ? Or as Dome somehow ?
You really rock !
ok, let's go...
ReplyDelete1. the layout scene is exactly this:
http://1.bp.blogspot.com/_umMI8GzDofk/TCuGuEcPTwI/AAAAAAAAAU8/wO67KXcQmKU/s1600/matte_concept.jpg
I hid some reference elements (grids, cylinders, boxes...) that i rendered and used later to match perspective, scale, shadow direction, etc. with the photo and painted elements.
2. Of course, i put the camera where i wanted, in that case i would to simulate a stand person beside the road seen a car approaching very fast, then i put the camera at distance of 3 meters of the road and at height of 2 meters.
3. yes, i didn't use any matte painting yet. I created a new camera and aligned with other, but not aligned orientation, only position, the orientation can be any world axis (x, y, z). In my case i oriented in "x" axis, perpendicular to the road placed over "y" axis (i think in maya "Y" = "z" ). It's very important align the camera position, if not, the matte not match with the animation. And the orientation axis is important to reorient the texture in the dome in steps of 90º if is necessary.
The quality of 360º pano wasn’t important, because it was only a reference. Only when i needed a particular element that i thought was more easy to make in 3d (the road, light-poles and some rocks) i made a quality render a save it in tga 32bits, RGB+Alpha.
4. To put the pano in the scene:
I created a sphere (the dome), align with the cameras (very important, if not, the matte doesn’t match with the animation), then i put the 360º pano like a texture, and reoriented in my case 180º and inverted "u" texture coordinates because the texture is projected inside the sphere.
Ok, all match perfect. But i had a big image (the pano) and i only needed a piece of it.
How to crop the image and reproject?
I cut off all polys of sphere out off animation camera. Then i put environment color black and rendered again a pano. After that, I cut off the black area in the pano and obtained the previous image, then i resized to 10000px. (calculated previously and relevant to output frame render of the animation).
To reproject that piece of pano on the piece of sphere, i applied a new material with the texture cropped, edited uv's and refitted them and... it was all.
Really all this process was easy, the difficult was to paint the matte.
I hope i've answered your doubts.
Greets.
THANK YOU so much for your reply, highly appreciated !
ReplyDelete1. LAYOUT
That's exactly the core, the point I don't understand right.
I could see that your 3d layout pano image does 100% match with the pano photo.
And that's what I don't know...
HOW TO DO THAT ?
You said that you place a 3d cam, and then you match.
Hmm.. but how does that matching process look like ?
That would be great to know.
Thank you so much for all your efforts !
No problem and you're welcome.
ReplyDeleteok, i think i've found your problem.
I don't need match 3d layout with pano photo because this is not a photo, it's a painting. I started in photoshop by 3d layout and i painted over it, then all match perfect.
Anyway, if you want match a 3d with a pano photo the camera always will be in the center. After that you will need to find the horizon to set the camera height, usually the 3d cameras have a show horizon option, and match it with the photo. Now you can match the 3d element with relative precission. If you can get measures, all work better and you will get more precission.
Greets.
Thank you so much for getting back. Ahaaa.... that makes sense...
ReplyDeleteok.. so you start first with your 3d layout, and you don't really care about a pano first, right ?
But now I am more curios... I think now I can follow better, but just to understand 100%.....
1. you create your 3d scene
2. you position your camera
3. you render from that camera a 360 pano (just gray clay render)
4. you open that render in photoshop and paint over
5. how does it continue ?
ok.. I hope till point 5 I got it right now...
But what I still can't imagine... once your matte-paint is done... how do you bring it back inside your 3d software ?
You map it as an image plane, or what do you do with it ? And do you map texture maps on your 3d elements ?
Thank you so much for your interesting blog here..
highly appreciated !
Now, go to the step 4(put the pano in the scene)of my previous comment.
ReplyDeleteHi CaktusBill !
ReplyDeleteThank you so much for your help.. hmm.. I really feel a bit dumb .. but I don't understand how you setup the painted pano in your 3d scene ?
I try by myself, here is a 3d layout:
http://www.mediafire.com/imgbnc.php/f981a5bb2011ee248df66b8bd97b7a4a735bc8f9c9310c7ef1d83f77590a818f6g.jpg
Here is the simple .obj scene file:
http://www.mediafire.com/?qojcs2jn1wzfjvx
and here is an .fbx file:
http://www.mediafire.com/?2384w9uiqouvcq9
I do understand, that you project your painting on a sphere - ok...
and you position the sphere in 3d space - and when you look through your camera, it looks like the painting matches with all your 3d objects ?
Gives me really some headache, because I can't get to that point...
thank you so much for your patience...
maybe if you could send me just the max file with the camera and the dome you are talking about... so I can see inside the scene what you did...
that would be awesome !
THANK YOU SO MUCH !
ok, no problem.
ReplyDeleteWhen i imported your files the camera not was animated. I make a little animation simulating the desert road cam, but you can make any rotation, as you could see.
This is your test scene with the cameras setup and the pano projected in maya and 3dsmax.
Maybe you need "re-path" the pano texture, because it was in my desktop folder.
http://dl.dropbox.com/u/17557151/PanoTest_caktusbill.zip
Greets
WOW - THIS IS FANTASTIC !
ReplyDeleteWell.. thank you so much for this incredible thing here... I am so exited right now...
I opened both scene files to check what's going on...
well.. in both scenes the animated camera matches 100% with the dome and the projected matte.
UNBELIEVABLE... I am still so exited.. that I don't know what to say....
ok.. ok... a few more things...
1. You didn't use the PANO I made... why not ?
- Is my pano not working ?
- Did I do something wrong when creating my pano ?
- Why does my pano look different to your one ?
2. Pano Cam inside the 3d scene
I checked the pano cam in both scene files (max/maya) and tried to render the pano you provided... but it IS NOT RENDERING the pano you inlcuded to the scene files... Why not ?
3. Setup the pano cam
- How should I setup the pano cam like you did ?
- How to setup to get the same pano output you provided in your scene ?
I guess now I do understand the whole process... you try to project the pano on the sphere, and you match it with your 3d environment....
but I still can't get the setup for the pano cam - HOW TO DO THAT ?
This is super cool.. thank you so much !
well,
ReplyDelete1. your pano is not a 360º. I think this answers all your questions ;)
2. In 3dsmax to render a pano go to utilities tab, press more and select panorama exporter. Basically it makes 6 renders and stitch them, then you can export as a spherical or cilindrical pano. In maya i don't know the process, but maybe you will need a mental ray shader like js_panoramic. You can download from here:
http://www.pixero.com/downloads_mr.html
or to MAC OS X:
http://www.andrewhazelden.com/blog/2011/01/js_fisheye-and-js_panoramic-compiled-for-maya-2011-x64-on-mac-os-x/
3. I explained you how i setup the pano camera in the third point of a past comment.
Greets.
Que tal un saludo, he visto unos proyectos que has realizado y son muy buenos. Tengo una duda respecto a este proyecto. Veo que tienes una enorme foto muy panoramica. En una de las imagenes de arriba veo que has mapeado esa imagen o la has distorsionado formando un cilindro para supongo poder girar la camara de extremo a extremo, hasta ahi todo ok porque lo he hecho anteriormente pero, en otra imagen veo que tienes modelada la escena de la carretera con las rocas del fondo y los postes de luz. Por qué modelar? como lo posicionas en tu escena o cual es el proposito de modelarlo? O dicho al revez, si modelas, porque usar la imagen distorsionada cilindricamente. Por fa si puedes sacarme de esa duda te lo agradeceria. Por cierto, como modelaste la escena de estas rocas con el piso, carretera y todo a partir de una imagen, como proyectas los objetos 3D ya que veo que calzan exactamente en cada posicion con la foto que forma un cilindro en un espacio tridimensional si la imagen es una foto, saludos cordiales.
ReplyDeleteHola Abel, en verdad no es una foto, es un render panorámico en el que he pintado y compuesto imágenes y renders por encima. Después lo he vuelto a proyectar en un cilindro, por eso encaja todo perfectamente. El render de la escena inicial es esta:
ReplyDeletehttp://1.bp.blogspot.com/_umMI8GzDofk/TCuGuEcPTwI/AAAAAAAAAU8/wO67KXcQmKU/s1600/matte_concept.jpg
Algunos elementos estan modelados porque me facilitan el trabajo simplemente. Tener que pintar 20 postes de luz es un poco aburrido, con las rocas me costaba encajar la perpectiva y conseguir el aspecto que queria asi que decidí modelarlas y pintar por encima el detalle.
Al modelarlo en la propia escena inicial después solo era sacar un render panorámico con alpha y montarlo en el photoshop.
Es decir no adapto elementos 3d a una foto sino que creo una foto a partir de elementos 3d, imagenes y pintando... en verdad es un collage.
Te puedes bajar esta escena para 3dsmax y maya donde puedes ver como está hecho. Es una escena que me paso un compañero, "cosmos", para que se lo mostrase, espero que no le importe... lo importante es aprender :)
http://dl.dropbox.com/u/17557151/PanoTest_caktusbill.zip